How To Make An Explainer Video In 5 Simple Steps | Easy Guide
Learn how to make an explainer video in 5 simple steps. Get actionable tips and examples to create engaging content.
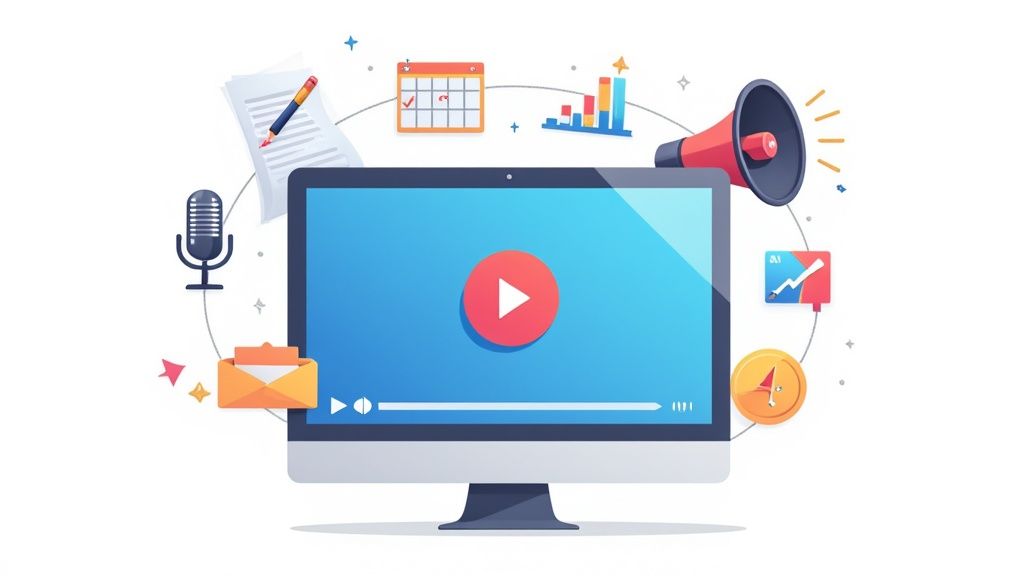
An explainer video project really comes down to five key stages: scripting, storyboarding, picking a production style, animating, and finally, the launch. This simple process is how you turn a complex idea into something clear and engaging that gets people to pay attention and take action.
Why Explainer Videos Are a Marketing Game Changer
Before we dive into the nitty-gritty of making an explainer video, let's talk about why they're such a powerful tool. In a world crowded with content, grabbing and holding someone's attention is everything. Explainer videos are brilliant at this because they package information into a short, easy-to-digest, and visually appealing format that just clicks with how people consume content today.

Think about it. You could write a 1,000-word blog post detailing your new software feature, or you could show it in a slick, 90-second animated video. Which one do you think is more likely to be watched, understood, and shared? For most people, the video wins hands down.
The Psychology Behind Their Success
Explainer videos just work with our brains, not against them. We're visual creatures by nature. When you combine audio with moving visuals, our ability to retain information shoots up compared to just reading text. This multi-sensory experience makes your message stick and builds a much stronger connection with your brand.
It's all about a few key advantages:
- Simplifying Complexity: They have a knack for breaking down complicated products, services, or ideas into simple, clear narratives.
- Boosting Engagement: The movement and sound in a video hold our attention way better than static words on a page.
- Increasing Conversions: When you present a clear value proposition in an engaging video, it can directly nudge people toward making a purchase.
Driving Tangible Business Results
And the data backs all of this up. Explainer videos are a favorite for video marketers, with a solid 73% using them to show off product benefits. A massive 98% of consumers have watched one to learn more about a product, and an incredible 87% were convinced to buy something after seeing one.
But here's the catch: quality is non-negotiable. 91% of people say that the quality of a video directly impacts how much they trust a brand.
An explainer video isn't just another piece of content; it’s a strategic business tool. It's your 24/7 digital salesperson, clearly explaining what you do to anyone, anywhere, anytime.
These videos are a crucial part of any solid content marketing plan. Understanding the bigger picture of content marketing best practices will only make your videos more effective. The real magic is their ability to build trust and create clarity in a short amount of time. If you want to go deeper, check out our guide on the many benefits of explainer videos for your business.
Crafting a Compelling Script and Storyboard
A flashy animation might grab someone's attention for a second, but it's the story that actually holds it. Your script is the absolute bedrock of your explainer video. It’s where you make a real connection with your audience, get your message crystal clear, and nudge them to take the next step.
Trying to rush through the scripting phase is like building a house on a shaky foundation. No matter how incredible the design is, the whole thing will eventually fall apart.
The secret is to write for the ear, not the eye. You want your script to sound like a natural, flowing conversation, not a dry technical document. Keep your language simple and direct—something anyone can easily grasp. A fantastic rule of thumb is to read every single line out loud. If it feels clunky or robotic when you say it, trust me, it’s going to sound ten times worse with a professional voiceover.
Structuring Your Narrative for Impact
The most memorable explainer videos don't just rattle off a list of features; they tell a compelling story. The classic problem-solution-benefit model is a tried-and-true framework for this. It's a simple but incredibly effective way to take your viewer on a journey from their specific pain point to your elegant resolution.
- The Problem: Kick things off by hitting on a pain point your ideal customer deals with every day. Show them you genuinely get their struggle. For example, "Are you tired of juggling a dozen different spreadsheets just to keep track of project deadlines?"
- The Solution: This is your "aha!" moment. Seamlessly introduce your product or service as the obvious, simple answer. "Meet ProjectFlow, the single dashboard that brings all your project data into one clean, organized view."
- The Benefit: Now, paint a vivid picture of their success. Don't just talk about features; show them the positive, emotional payoff of using your solution. "Finally, you can deliver projects on time, every time, and get back to focusing on the work that truly matters."
This structure is so powerful because it's built on empathy and logic. It positions your solution as essential and valuable, not just another piece of software shouting for attention. If you're looking for more frameworks to get started, our deep dive into writing an effective explainer video script is a great resource.
From Words to Visuals with a Storyboard
Once you've polished your script and it feels right, it’s time to bring it to life with a storyboard. Think of this as the visual blueprint for your video—a sequence of simple sketches mapping out every single scene. You don't need to be an artist; stick figures and basic shapes will do the trick just fine.
A storyboard's real job is to sync the script with the visuals, frame by frame. For each line of dialogue or key piece of action, you’ll draw a corresponding visual scene. This step is crucial for spotting potential problems early on—like awkward pacing or a visual metaphor that just doesn't land—before you sink a ton of time and money into the animation phase. It makes sure everyone, from the animator to the project stakeholders, is on the exact same page.
This infographic breaks down how the script and storyboard are two halves of the same whole.
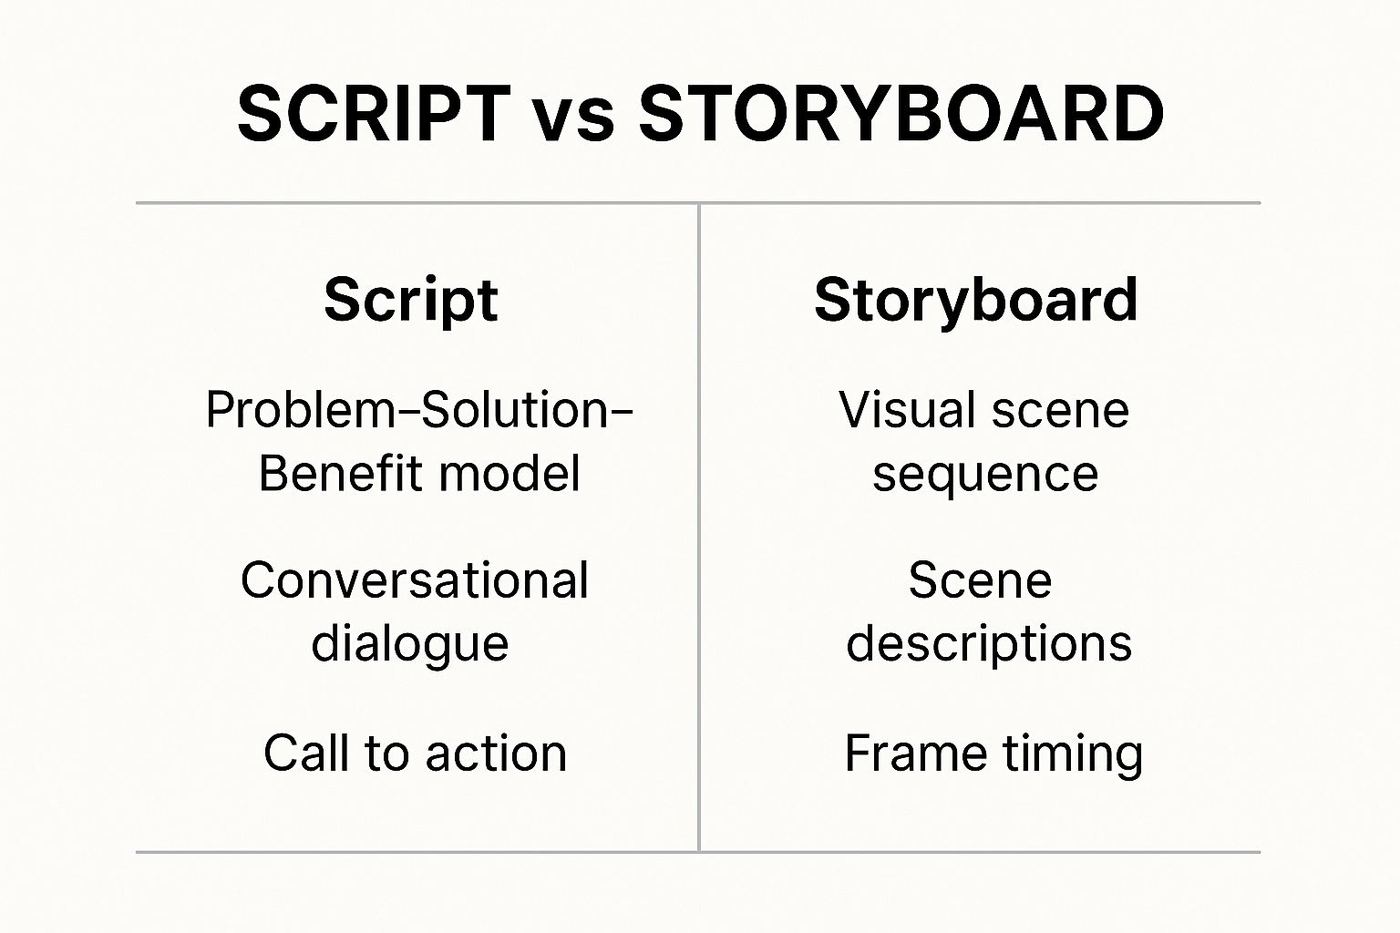
As you can see, the script is the narrative heart of the video. The storyboard then takes that narrative and translates it into a concrete visual plan, ensuring everything comes together cohesively in the end.
A great script tells the story. A great storyboard shows the story. You absolutely need both to create an explainer video that not only informs but also inspires people to act.
Choosing Your Production Style and Tools
Once your script is locked and the storyboard is sketched out, it’s time to tackle the fun part: deciding what your video will actually look and feel like. This is where you pick a production style that not only looks sharp but also lines up perfectly with your brand’s personality, the tone of your message, and, of course, your budget. The right style makes your story click; the wrong one can make everything feel off.
There's a whole world of styles to explore, and each one brings something different to the table. Think of this less as just picking an aesthetic and more as choosing the best vehicle to drive your message home.
Finding the Right Visual Style
Every style sends a different signal. A slick, modern SaaS company might gravitate toward motion graphics to explain their tech, while a nonprofit telling a deeply human story would probably find live-action far more powerful.
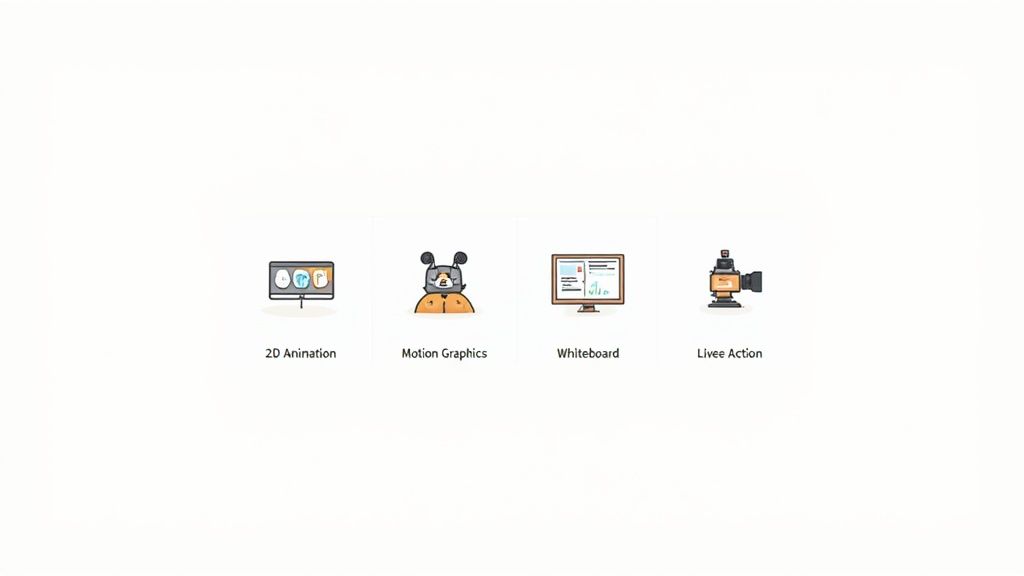
Here are the heavy hitters you’ll want to consider:
- 2D Character Animation: This classic approach uses relatable characters to walk viewers through a narrative. It's an absolute winner for building an emotional connection and making complex human interactions feel simple.
- Motion Graphics: By focusing on animated text, icons, and slick transitions, this style is clean, professional, and perfect for breaking down data, processes, or abstract concepts.
- Whiteboard Animation: This style simulates someone drawing on a whiteboard, which creates a really engaging, "live creation" feel. It’s fantastic for educational content because it holds attention by building the visuals piece by piece.
- Live-Action: Nothing builds trust and authenticity like using real people and real locations. This is the go-to for customer testimonials, demos of physical products, or creating a personal brand connection.
Your choice of style is a strategic decision. It should amplify your brand's voice and make your core message clearer, not just follow a trend. Ask yourself: which format will make our story most compelling to our specific audience?
DIY Software vs. Hiring an Agency
With a style in mind, the next big question is how you’re going to get it made. Your two main paths are using do-it-yourself (DIY) software or bringing in a professional agency. Each comes with clear trade-offs in terms of cost, time, and the quality of the final video.
The explosion of user-friendly tools has put video creation within reach for almost everyone. In fact, the global market for explainer video software was valued at around USD 1.2 billion in 2023 and is projected to hit USD 6.7 billion by 2033. This growth is powered by cloud-based platforms that don’t require a film degree to use. You can dive deeper into this trend with recent industry research.
So, which route is right for you? It really boils down to your resources and priorities.
Comparing Explainer Video Production Options
Making the call between DIY, a freelancer, or a full-blown agency can be tough. This table breaks down what you can generally expect from each option in terms of the big three: money, time, and final quality.
Explainer Video Production Method Comparison
| Production Method | Average Cost | Typical Timeframe | Best For |
|---|---|---|---|
| DIY Software | 50 to 500 dollars | 1 to 3 weeks | Startups with tight budgets simple concepts or fast turnarounds |
| Freelancer | 1,000 to 5,000 dollars | 2 to 4 weeks | Teams needing specific skills without agency overhead |
| Video Agency | 5,000 to 25,000 plus dollars | 4 to 8 weeks | Businesses needing high end custom animation with full production management |
DIY tools are fast and affordable, but they often box you in creatively and demand a serious time commitment from your team. On the other hand, an agency delivers that polished, professional quality and handles everything for you, but it comes with a much higher price tag.
For a detailed look at the tools out there, check out our guide on the best explainer video software. It can help you figure out if a DIY platform is a good fit. Ultimately, the right choice always comes down to what you value most: speed, cost, or quality.
Bringing Your Vision to Life with Animation and Voiceover
Once your script is locked and the storyboard gets the green light, we hit the production phase. This is where the magic really starts to happen, and all that planning pays off. The first piece of the puzzle? The voiceover. It's an element people often rush, but it’s absolutely critical.

The right voice is what sets the entire tone for your video. I’ve seen brilliant scripts completely fall flat because of a flat, uninspired delivery. On the flip side, a warm, engaging voice can elevate a good video into something truly great.
Securing the Perfect Voice
Think of your voiceover artist as the narrator of your brand's story. Their tone, pacing, and energy have to be a perfect match for your message. An upbeat, friendly voice might be perfect for a new consumer app, but you'd want a calm, authoritative tone for a financial services explainer.
When you're sifting through talent on freelance sites or working with an agency, keep these points in mind:
- Listen to Demos: Really pay attention to their range. Can they hit the specific emotion and energy your script needs?
- Provide Clear Direction: Before they ever hit record, give the artist a solid brief. Tell them about your target audience, your brand’s personality, and the feeling you're going for. "Conversational and helpful" or "confident and inspiring" is way more useful than just saying "sound professional."
- Check the Audio Quality: Make sure their recordings are clean, crisp, and totally free of background noise. Poor audio will make your video feel amateur, no matter how slick the animation is.
The voiceover is the heartbeat of your explainer video. It guides the viewer through the narrative and provides the emotional foundation upon which the visuals are built. Getting it right is non-negotiable.
Once you have that final voiceover track, it essentially becomes the ruler for the entire animation process. Every single visual—from a character's wave to a slick transition—is timed to sync perfectly with the spoken words.
Animating Your Story Frame by Frame
Now, let the visual fun begin. The animation phase is where your static storyboard gets up and moves, transforming into a living, breathing narrative. This is all about creating the visual components—characters, backgrounds, icons, text—and setting them in motion.
This is where all that detailed storyboard work pays off in a big way. Your animator will use it as a frame-by-frame guide, ensuring the story unfolds exactly as you planned it. They'll obsess over timing each movement and transition to the rhythm of the voiceover, creating a seamless experience for anyone watching. For a deeper dive into this stage, we’ve got a complete breakdown in our guide to the animation process.
Finally, the animator adds the polish that really brings the video to life. This means finding the right music track to complement the mood and adding subtle sound effects—the clicks, swooshes, and pops that make the action on screen feel tangible. These audio details work together to create a professional final product that grabs and holds attention.
Perfecting Your Video in Post-Production
The animation is rendered and the voiceover is locked in, but your video isn’t quite ready for its grand debut. Post-production is that final, crucial stage where you assemble all the pieces and polish them until they shine. This is where a good video becomes a great one, refining the pacing, color, and sound to create something that feels genuinely professional.
Think of this phase as the detailed finish work that separates amateur content from polished, brand-defining assets. It's less about creating new things from scratch and more about elevating what you already have. Honestly, even a few small tweaks here can make a world of difference in the final product.
Fine-Tuning the Visuals
Your first task is to lock down the visual flow. This means trimming scenes to tighten up the pacing and making sure every transition feels smooth and intentional. A clunky cut can easily jolt a viewer out of the experience, while a seamless one keeps them hooked from start to finish.
Next up, let's talk color. Color correction is all about ensuring visual consistency from one scene to the next. Then there's color grading, which gives your video a specific mood and aesthetic that lines up with your brand. Do your brand colors pop? Is the tone warm and inviting, or is it cool and corporate? These choices are what reinforce your brand's identity.
For a deeper dive into editing techniques, check out our complete guide to video editing.
Mastering the Audio Mix
Sound is every bit as important as the visuals—sometimes more so. Poor audio quality can completely tank an otherwise excellent video. The whole point of sound mixing is to create a balanced, clean audio experience where every element has its place.
- Voiceover: The narration should always be clear, crisp, and the primary focus. No exceptions.
- Music: The background track needs to support the emotional tone without ever overpowering the speaker.
- Sound Effects: These should be subtle. Use them to add depth and emphasis to on-screen actions, not to distract from the message.
A great audio mix is one you don't even notice. The voiceover is perfectly clear, the music sets the mood, and the sound effects feel natural. It all just works together.
Finally, before you even think about hitting that export button, run through one last quality check. Verify the resolution, confirm the file format is right for the platforms you'll be using, and double-check that all your branding—like your logo or a final call-to-action screen—is present and looks sharp.
Keeping all your project files organized can be a real challenge; implementing efficient digital asset management for video is a smart move for any team. This final review ensures your explainer video is absolutely ready to make a powerful first impression.
Launching Your Video for Maximum Impact
Alright, your perfectly crafted explainer video is finished. High fives all around! But don't pop the champagne just yet. Creating the video is only half the battle—the other half is making sure it actually gets seen by the right people. A smart, multi-channel launch is what turns your creative investment into real, measurable results.
Whatever you do, don't just upload your video to one platform and hope for the best. You need to think of your launch as a coordinated campaign, hitting every channel where your audience spends their time. The goal here is to build momentum and get as many eyeballs on it as possible from day one.
Start with your own turf: your website. Placing your new video front-and-center on your homepage or a key product page can immediately grab attention and help visitors understand what you do in less than 90 seconds. This is your most valuable digital real estate, so use it.
Getting Your Video Discovered
Beyond your website, platforms like YouTube and Vimeo are non-negotiable for hosting and discoverability. But a simple upload won't cut it. You have to put on your video SEO hat to help people find your content through search.
- Craft a Compelling Title: Your title needs to be rich with keywords but also intriguing enough to click. Instead of "Our New Software," try something like "Project Management Software That Ends Missed Deadlines."
- Write a Detailed Description: Use the description to dig deeper into the problem your video solves. Make sure to include your main keywords and, critically, a link back to your website right at the top.
- Use Relevant Tags: Think like your customer. Add a mix of broad and specific tags related to your topic, industry, and audience to help the platform's algorithm show your video to the right people.
This isn't just busywork; it's essential for pulling in organic traffic. Remember, YouTube is the world's second-largest search engine. Optimizing your content there is a powerful long-term play.
Your video's launch isn't a single event—it's the beginning of its life cycle. A thoughtful distribution plan ensures it continues to attract viewers, generate leads, and deliver ROI long after its initial release.
Spreading the Word and Amplifying Your Reach
Once your video is live and optimized, it's time to get proactive with promotion. Your existing marketing channels are the perfect launchpad for driving that initial wave of viewership and engagement.
Email marketing is a fantastic place to start. Announce the new video to your subscriber list with a subject line that sparks curiosity. Instead of just a text link, embed a thumbnail of the video that clicks through to the full version. This little trick can seriously boost your click-through rates.
Then, hit your social media channels like LinkedIn, Twitter, and Facebook. Animated explainer videos are incredibly shareable, which can give your organic reach a massive lift. In fact, they get shared 12 times more than posts with just text and images. That's some serious viral potential right there. You can learn more about how animated videos are changing content marketing.
Finally, if you want to make an immediate splash, consider putting a small budget behind paid ads. Promoting your video on platforms like YouTube or LinkedIn lets you target your ideal customer profile with laser precision. This guarantees your message reaches a relevant audience and jumpstarts your engagement metrics from the get-go.
Frequently asked questions
When the same format has to ship consistently, when the gap from in-house quality is visible to the audience, or when the team should be spending its time on strategy instead of production.
Lock the goal, audience, and channel before kickoff. Reserve early rounds for structural feedback and save polish notes for the final pass. Mixing the two stretches every cycle.
Distribution. Teams design the asset before deciding where it will live, then awkwardly retrofit format and length to the channel. For explainer video work, decide the channel first, then design backward.

