The Ultimate Guide to Vertical Video Dimensions
Master vertical video dimensions with our complete guide. Get the exact specs for TikTok, Reels, Shorts, and more to maximize engagement and reach.
Try it now: Check vertical sizes per platform with Moonb’s free social media sizes tool, no signup, nothing uploaded: moonb.io/tools/social-media-sizes
When it comes to vertical video, the magic numbers are 1080×1920 pixels. This translates to a 9:16 aspect ratio, the tall, skinny format that has become the gold standard for platforms like TikTok, Instagram Reels, and YouTube Shorts.
Getting these dimensions right from the start is the key to creating content that looks professional and grabs attention. It ensures your video fills the entire mobile screen, creating that immersive, full-screen experience that viewers have come to expect.
Why Vertical Video Is Essential for Modern Marketing
Let's be clear: mastering vertical video isn't just a "nice-to-have" skill for marketers anymore. It's a fundamental requirement for any brand that wants to connect with a mobile-first audience. The entire digital landscape has shifted, and platforms are now built to reward content that fits the native, vertical way people hold their phones.
A full-screen video feels more personal and direct, which is why it consistently drives higher engagement. When your content fits the frame perfectly, it looks polished and intentional. This encourages more likes, comments, and shares. For a deeper look at how to build a winning approach, it's crucial to understand the role of different vertical content strategies.
The Impact of Incorrect Dimensions
On the flip side, uploading a video with the wrong dimensions can instantly make your brand look amateurish. It creates a jarring experience for the viewer and can torpedo your engagement before you even get started.
Here are a few of the common pitfalls:
- Distracting Black Bars: A horizontal video squeezed into a vertical player leaves those ugly black bars at the top and bottom. It immediately signals to the viewer that this content wasn't made for them.
- Awkward Cropping: When a platform tries to force a wide video into a tall frame, it often crops out key parts of the shot. This can make your video confusing or completely ruin the visual story you're trying to tell.
- Signaling Low Quality: Both users and the platform's algorithm can interpret poorly formatted video as lazy or low-quality. This can seriously limit your reach and overall impact.
The bottom line is that the 9:16 aspect ratio at 1080×1920 pixels is the professional standard for a reason. Sticking to these specs is one of the easiest ways to maximize your video's performance and ensure it looks great on every platform that matters.
Your Go-To Vertical Video Specs Chart
If you're a marketer or creator who needs the right specs now, this is for you. We've put together a quick reference chart with the most important vertical video dimensions and requirements for the major social media platforms.
Think of this as your cheat sheet. It's designed to take the guesswork out of optimizing your videos, saving you a ton of time during production. Go ahead and bookmark this page—you'll be glad you did the next time you're ready to export a project.
Before we dive into the numbers, this visual perfectly captures why a vertical-first approach is so crucial. It’s all about the format, the viewer's experience, and, ultimately, the engagement.
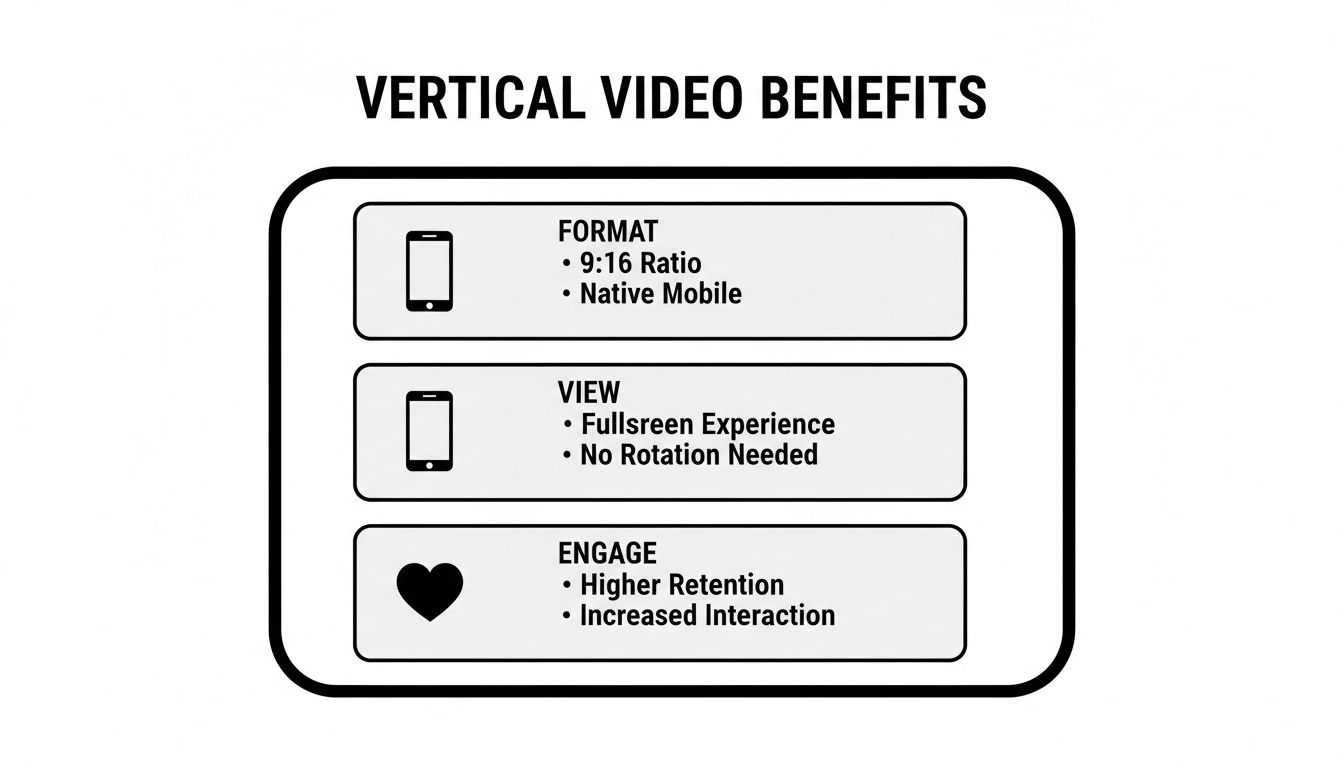
As you can see, the native 9:16 format is key. It creates that immersive, full-screen experience on mobile that really pulls viewers in and keeps them watching.
Vertical Video Specifications by Platform
Okay, let's get into the nitty-gritty. The table below is a straightforward summary of the technical specs you'll need for today's most popular vertical video platforms. Sticking to these guidelines is your best bet for avoiding weird compression artifacts, awkward cropping, or those dreaded black bars.
| Platform | Aspect Ratio | Resolution (Pixels) | Max File Size | Max Length |
|---|---|---|---|---|
| TikTok | 9:16 | 1080x1920 | 287 MB (iOS) | 10 minutes |
| Instagram Reels | 9:16 | 1080x1920 | 4 GB | 90 seconds (organic) |
| Instagram Stories | 9:16 | 1080x1920 | 4 GB | 60 seconds (per clip) |
| YouTube Shorts | 9:16 | 1080x1920 | 256 GB | 60 seconds |
| Facebook Reels | 9:16 | 1080x1920 | 4 GB | 90 seconds |
| Pinterest Pins | 2:3 or 9:16 | 1080x1620 (2:3) | 2 GB | 15 minutes |
| LinkedIn Feed | 9:16 | 1080x1920 | 5 GB | 10 minutes |
Getting these specs right from the start means your content will look exactly how you intended it to on every platform.
Quick Glossary: What Do These Specs Mean?
To really get the most out of this chart, it helps to know exactly what these terms mean for your workflow. Here's a quick rundown.
- Aspect Ratio: This is just the proportional relationship between the video's width and its height. For vertical video, 9:16 is the gold standard because it's built to perfectly fill a phone screen.
- Resolution: Measured in pixels, this is all about your video's sharpness and clarity. The standard for vertical video is 1080x1920 pixels, which gives you a crisp, Full HD image without making your file sizes ridiculously huge.
- Max Length: Pretty self-explanatory—this is the longest your video can be for a specific placement. It’s always a good idea to check this before you start editing to make sure your story fits within the platform’s constraints.
While this chart covers the absolute essentials, there's always more to learn. For a deeper dive, check out our other guides on the best video formats and aspect ratios for maximum engagement.
TikTok Video Dimensions and Safe Zones
TikTok is the undisputed king of vertical video, the platform that really started it all. If you want your content to feel native and actually perform, playing by their rules is non-negotiable. The absolute must-have is a 9:16 aspect ratio, which means your video needs to be 1080x1920 pixels.
Sticking to this size is what makes your video fill the entire smartphone screen, pulling viewers in without those clunky black bars on the sides. For businesses trying to make a splash with TikTok Ads, getting these basics right is the first step to creating content that connects with the platform's fast-moving audience.
Beyond the frame size, there are a few technical specs you’ll want to keep in mind. Following these helps avoid weird compression issues and keeps your video looking sharp after you upload it.
- Recommended Codec: H.264 is the way to go. It gives you a great balance of video quality without creating a massive file.
- Maximum File Size: This one's a little quirky. iOS users can upload files up to 287 MB, but Android users are limited to 72 MB for direct uploads.
- Video Length: While TikTok built its reputation on short, snappy clips, you can now upload videos up to 10 minutes long. This opens up a lot more room for deeper storytelling.
Navigating TikTok’s UI and Safe Zones
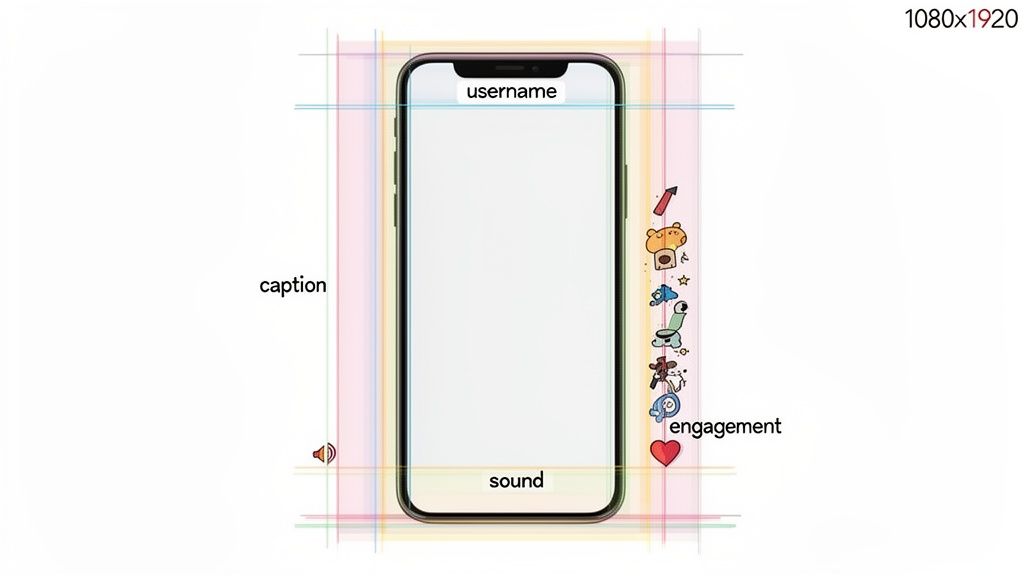
Knowing the dimensions is only half the battle. The other, arguably more important, part is learning to design around the TikTok user interface (UI). If you're not careful, the app's overlay will cover up key parts of your video. These "safe zones" are the areas where you know your visuals will be seen without obstruction.
The bottom of the screen is especially busy—it's where you'll find the username, caption, and the scrolling sound title. Over on the right, you have all the engagement icons: like, comment, and share. A classic mistake is placing important text, your logo, or a call-to-action in these spots, which makes them completely unreadable.
The most important elements of your video—like your product in action or a critical text overlay—should always be smack in the middle of the frame. This central area is your guaranteed safe spot, clear of any of TikTok's interface clutter.
Think of it like having invisible margins you just can't cross. When you keep your vital information within that central safe zone, you're ensuring that everyone gets the message loud and clear. This simple bit of strategic placement is what separates amateur content from the polished, professional videos that really perform.
Instagram Reels and Stories Dimensions
Instagram is a true powerhouse for vertical video, and its two flagship formats, Reels and Stories, are the reason why. While they both look similar—designed for that full-screen, immersive mobile experience—they have some key differences under the hood that every marketer needs to know.
Getting the basics right starts with the shared 9:16 aspect ratio and the optimal 1080x1920 pixels resolution. Nailing this ensures your video looks crisp, professional, and fills the entire screen without any of those awkward black bars that scream "amateur." This is table stakes for creating an immersive view that actually gets results. And the results speak for themselves: vertical videos pull in 58% higher engagement on mobile devices than horizontal ones.
As for file types, stick with the standards. Instagram plays nicely with both MP4 and MOV formats, so using either will help you avoid frustrating upload errors and ensure your video plays smoothly for everyone.
Technical Specs for Reels and Stories
At a glance, they might seem interchangeable, but Reels and Stories have different time limits that will directly impact your creative strategy. Knowing these constraints is crucial for planning your content without running into trouble.
- Instagram Reels Length: Organic Reels can now run up to 90 seconds. This gives you a lot more breathing room for deeper storytelling, tutorials, or product demos.
- Instagram Stories Length: A single Story clip is capped at 60 seconds. You can always string multiple clips together for a longer narrative, but each piece has to stand on its own.
- Maximum File Size: Both formats share a generous 4 GB max file size, which is more than enough for high-quality 1080p uploads.
If you really want to get the timing of your content just right, check out our detailed guide on the optimal Instagram Reel length.
Here's a common mistake we see all the time: creating one 90-second video and trying to post it to both Reels and Stories. This will cause your video to get awkwardly chopped off on Stories, completely ruining the experience. Always take the extra step to edit a separate, 60-second version specifically for your Story.
Designing for Instagram Safe Zones
Beyond the technical specs, the single most important part of creating effective Reels and Stories is designing for the "safe zones." Instagram overlays a ton of UI elements on top of your video—your username, the caption, interactive stickers, like and comment buttons. If you place important text or visuals in these areas, they'll be covered up and unreadable.
The bottom of the screen is especially crowded with the caption and all the engagement buttons. The top-left corner is also off-limits, as that’s where your profile info sits.
Think of the very center of the screen as your primary "safe zone." This is where your most important visuals and key messages will always be visible. Get in the habit of positioning your critical content here to guarantee it has the maximum impact and clarity.
YouTube Shorts Dimensions and Best Practices
While YouTube practically invented landscape video, the platform has gone all-in on vertical content with YouTube Shorts. If you want your video to show up in the Shorts feed and get the right kind of attention, you have to play by their rules. That means sticking to a specific vertical video dimension of 1080x1920 pixels, the standard 9:16 aspect ratio.
You might be tempted to upload a square (1:1) video, and while YouTube might still categorize it as a Short, you'll miss out on that immersive, full-screen experience. Let's be honest, that's the whole point. Sticking to 9:16 is the only way to guarantee your content looks like it belongs in the Shorts feed.
Beyond the basic dimensions, a few technical specs will keep your video looking sharp and avoid any nasty compression issues.
- Recommended Codecs: Play it safe with widely supported codecs like H.264 for video and AAC-LC for audio. They give you a great balance of quality and file size.
- Video Length: This is a big one. To even qualify as a Short, your video must be 60 seconds or less.
- Maximum File Size: YouTube is incredibly generous here, allowing up to 256 GB. You'll almost never have to worry about this with short-form content.
Understanding the YouTube Shorts UI and Safe Area
Just like every other vertical video platform, YouTube Shorts slaps its user interface (UI) right on top of your masterpiece. Knowing exactly where those buttons and text overlays will appear is the key to keeping your important visuals from being covered up. If this is a new concept for you, our guide to designing for short-form video Reels and other formats is a great place to get up to speed.
On the right side of the screen, you'll find the engagement icons—Like, Dislike, Comments, and Share. The bottom is where your channel name, caption, and the crucial "Subscribe" button live. It's a classic rookie mistake to place text or a call-to-action in these zones, only to have them completely disappear behind the UI.
The most effective YouTube Shorts keep the main subject or visual focus locked in the center of the screen. Think of this central area as your 'safe action zone,' which ensures that no matter what device someone is using, your most important content stays clear and visible.
When you design with this safe area in mind, you're making sure everyone sees your video exactly as you intended. It's a simple step that makes a huge difference in clarity and helps guide viewers to do what you want them to do, whether that's liking your video or hitting subscribe.
How to Design for Video Safe Zones
Nailing the correct vertical video dimensions is a great start, but it's only half the battle. To make content that actually works, you have to design around the user interface (UI) elements that each platform plasters over your video. This is where understanding safe zones becomes non-negotiable for getting your message seen.
Think of safe zones as the "no-fly" areas for your most important visual information. If you place a logo, a call-to-action, or critical text outside these zones, it’s going to get covered by a username, caption, or a bunch of engagement icons. It'll be completely useless.
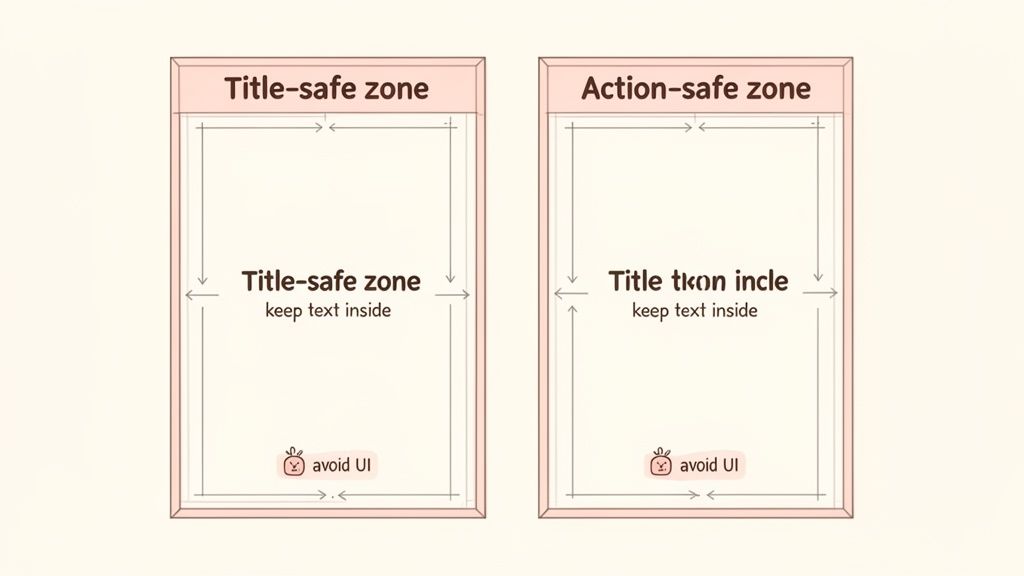
Understanding the Key Safe Zone Types
There are really two main types of safe zones you need to keep in mind during your design process. Each one protects a different part of your video's integrity.
- Title-Safe Zone: This is the absolute core of your screen. All text, subtitles, and logos must live here to guarantee they're readable and won't get cut off by the screen's edge or blocked by UI elements. Placing text here ensures it looks right on any device.
- Action-Safe Zone: This is a slightly bigger area surrounding the title-safe zone. You'll want to keep all the important visual action happening within this frame. For instance, if you're showing off a product, make sure the key movements and features are contained here so nothing gets hidden.
The massive shift to vertical video makes this more critical than ever. In fact, vertical video uploads in 1080×1920 saw a jaw-dropping 51% jump from 2023 to 2024. It’s a loud and clear signal that mobile-first content is king. Sellers Commerce's recent findings have even more data on these trends if you want to dig deeper.
Platform-Specific UI Obstructions
Every platform has its own unique layout, which can be a real headache. TikTok and Instagram Reels, for example, cram the username, caption, and sound details along the bottom, while the Like, Comment, and Share icons march up the right side.
This constant variation is why we need a universal strategy.
To give you a better idea of what you're up against, here’s a quick rundown of where the major platforms place their UI elements, cluttering up your beautiful video.
Platform UI Overlay Comparison
| UI Element Location | TikTok | Instagram Reels | YouTube Shorts |
|---|---|---|---|
| User Profile/Channel | Bottom-left | Bottom-left | Bottom-left |
| Caption/Description | Bottom-left, above profile | Bottom-left, above profile | Bottom-left, above channel name |
| Sound/Audio Details | Bottom-left, scrolling text | Bottom-left, above profile | Bottom-right, spinning icon |
| Like/Comment/Share | Stacked vertically on the right | Stacked vertically on the right | Stacked vertically on the right |
| Call-to-Action Buttons | Can appear mid-screen or bottom | Can appear mid-screen or bottom | Varies (e.g., "Subscribe" at bottom) |
As you can see, the bottom and right edges are prime real estate for platform UI. This makes keeping your key content centered the only surefire way to keep it visible.
The most reliable strategy is to keep all critical information—logos, key text, and primary action—within the central 60-70% of the screen. This central rectangle is your guaranteed safe area, clear of almost every platform's UI clutter.
This approach ensures your branding and key messages stay visible, no matter where your video ends up. Properly planning for these zones is a fundamental part of a professional design process in graphic design for any kind of motion content. It’s not just a suggestion; it’s a necessity.
Optimal Export Settings for Vertical Video
Getting your vertical video dimensions right is a great start, but it's the export settings that truly lock in a professional look. Your goal here is to strike that perfect balance between a crisp, clean image and a file size that uploads quickly and plays smoothly on any social platform.
If you get these settings wrong, you're risking pixelation, weird color banding, or even frustrating upload errors. It's the kind of thing that can undo all your hard work in the editing suite. By dialing in a standard export process, you can make sure every video you put out looks consistently polished.
Universal Export Preset Recommendations
Whether you’re working in Adobe Premiere Pro, Final Cut Pro, or another editor, the core principles for a high-quality vertical export are pretty much the same. These settings are your ticket to great-looking video on just about any platform that matters, from TikTok and Instagram Reels to YouTube Shorts.
- Format: Stick with MP4. It's the most widely accepted video format out there, giving you excellent compression without a noticeable drop in quality.
- Codec: Choose H.264 (AVC). This is the undisputed industry standard for web video, offering the best combo of quality and file size efficiency.
- Resolution: The gold standard is 1080x1920 pixels. This Full HD resolution looks sharp and clear on modern smartphones.
- Frame Rate: A frame rate of 30fps (frames per second) is perfect for most social media content. It delivers smooth motion without bloating your file size.
- Bitrate: For 1080p vertical video, a target bitrate between 10-15 Mbps (megabits per second) is the sweet spot. This keeps all the important visual details while keeping your file from getting too chunky.
The most common mistake people make is cranking the bitrate way too high. It feels like "higher is better," but social media platforms are just going to aggressively compress those oversized files anyway. Ironically, this can make your video look even worse. Staying in that 10-15 Mbps range gives you more control over the final product.
The best move you can make is to create a custom export preset with these settings. It'll save you a ton of time and guesswork on future projects. This simple step ensures technical consistency and cuts down the chances of running into strange, platform-specific upload issues. And if you ever need to juggle different formats for different platforms, our guide on how to convert video formats has some more helpful tips.
Common Questions About Vertical Video Dimensions
Diving into the world of vertical video can feel like learning a new language, especially when every platform has its own set of rules. We get a lot of questions from creators and marketers trying to nail down their workflow, so we've put together some quick answers to the most common ones.
Think of this as your go-to cheat sheet for reinforcing the key specs and best practices we’ve covered.
What Is the Best Aspect Ratio for Vertical Video?
Hands down, the gold standard for vertical video is a 9:16 aspect ratio. It’s the native format for all the major players—TikTok, Instagram Reels, and YouTube Shorts included.
Sticking to 9:16 ensures your video fills the entire mobile screen. You get that immersive, professional look without any distracting black bars or weird cropping, which is a big signal of quality to both viewers and the platform algorithms.
Why Is 1080x1920 the Recommended Resolution?
The 1080x1920 pixel resolution is simply the vertical, 9:16 version of Full HD (1080p). It hits the sweet spot, delivering crisp, clear visuals on modern smartphone screens while keeping file sizes small enough for a quick and painless upload.
You could export in 4K, but social platforms are notorious for aggressive compression. More often than not, they’ll crunch down that massive file anyway, wiping out any noticeable quality boost for someone watching on their phone. For that reason, 1080x1920 is the most practical and effective choice.
Can I Use a 4:5 Aspect Ratio for Reels or TikTok?
Technically, yes, you can upload a 4:5 video. But you probably shouldn't. On full-screen platforms like Reels and TikTok, your video will just end up sandwiched between black bars to make it fit the native 9:16 player.
That letterboxed look feels a bit amateur and completely breaks the immersive experience people expect. It’s a quick way to lose viewer engagement before your content even gets a chance to shine.
How Do I Adapt Horizontal Video for Vertical Platforms?
You’ve got a couple of solid options when you need to repurpose a horizontal (16:9) video for a vertical world.
- Crop the Frame: This is usually the best approach. Punch into the most important part of your shot and reframe it as a true 9:16 video. This keeps the action front and center and feels completely native to the platform.
- Use a Padded Background: If cropping isn't an option, you can place your horizontal clip in the middle of a 9:16 canvas. Just be sure to fill the empty space above and below with a branded background, text, or captions to make it look intentional.
Whatever you do, avoid just uploading the raw horizontal video. It will look tiny and get lost between huge black bars.
Struggling to create high-quality vertical videos that capture attention? The creative team at Moonb can help you produce stunning, perfectly optimized video content for every platform, every time. Learn more about our on-demand creative services.
Frequently asked questions
Group feedback by intent, not by source. Resolve structural notes first, then polish. Most apparent contradictions disappear once the notes are grouped this way.
If you can describe the audience, the action you want, and the channel in three short sentences without using marketing jargon, the brief is ready to move into production.
Three to six weeks end to end is a fair planning baseline. Most of that window is pre-production decisions; the actual TikTok video work is usually a fraction of the total calendar.

