How to Compress a Video Without Losing Quality: Easy Tips
Learn how to compress a video without losing quality with our easy guide. Save space and keep your videos crisp—click to discover the best method!

Let's be real: compressing a video without losing quality sounds like a magic trick. The secret isn't magic, though—it's about achieving a perceptually lossless result. This just means you get smart with modern codecs and the right settings to shrink the file size so much that the human eye can't even spot the difference from the original.
It’s all about finding that sweet spot between bitrate, resolution, and codec efficiency, not just making the video dimensions smaller.
Shrinking Videos While Keeping Them Sharp
Have you ever tried to email a video, only to get slapped with that dreaded "file too large" error? Or maybe you’ve uploaded a crisp clip to social media and watched in horror as it turned into a pixelated mess. If that sounds familiar, you're in the right place.
Figuring out how to compress a video without wrecking its quality is a constant battle for marketers, creators, and pretty much anyone who works with digital media.
The truth is, genuine "lossless" video compression—like using a ZIP file for a document—just isn't practical for day-to-day use. The files would still be massive. Instead, the real goal is to hit that perceptually lossless sweet spot where the file size is way smaller, but the video still looks so good that no one can tell it’s been compressed.
The Foundation of Smart Compression
Getting this right isn't about randomly hitting a "compress" button and hoping for the best. It's about knowing which levers to pull. Once you get past the technical jargon, the core ideas are surprisingly simple.
Here’s what actually makes a difference:
- Pick a modern codec. Think of a codec (like H.265/HEVC) as the language a computer uses to store video. Newer codecs are way more efficient, describing the same visuals with a lot less data.
- Optimize your bitrate. Bitrate is just the amount of data used for each second of video. Instead of just cranking it down, use a variable bitrate (VBR). This lets the software dedicate more data to complex, fast-moving scenes and less to simple, static shots. Genius, right?
- Rethink the resolution. Dropping from 4K to 1080p is the go-to move for many, but it's not always the best one. A 1080p video with a healthy bitrate often looks worlds better than a 4K video that's been starved of data.
Believe it or not, this technical dance has been going on for a while. The quest for efficient compression started as early as 1929, but it was the arrival of the Discrete Cosine Transform (DCT) in the 1970s that really paved the way for the digital video we use today.
Key Takeaway: Great video compression isn’t about making the picture smaller; it’s about making the data smarter. By focusing on modern codecs and intelligent bitrate settings, you can slash file sizes with almost no noticeable dip in quality.
Quick Guide to Perceptually Lossless Compression
To make this even easier, I've put together a quick cheat sheet. These are the settings and choices I find have the most impact when I need to shrink a file without sacrificing that sharp, professional look.
| Technique | What It Does | Impact on Quality & Size |
|---|---|---|
| Use an H.265/HEVC Codec | Employs a more advanced algorithm to store video information. | Massive file size reduction (up to 50% smaller than H.264) with the same visual quality. |
| Select Variable Bitrate (VBR) | Allocates data dynamically, giving more to complex scenes and less to simple ones. | Great balance. Keeps quality high where it matters most while optimizing overall file size. |
| Choose the Right Resolution | Sets the pixel dimensions of the video (e.g., 1080p, 4K). | Don't just downscale. A high-bitrate 1080p often looks better than a low-bitrate 4K. |
| Lower the Frame Rate (Sparingly) | Reduces the number of frames displayed per second (e.g., from 60 to 30 fps). | Good for talking heads, but can make high-motion scenes look choppy. Use with caution. |
Ultimately, running a few tests with these settings is the best way to find the perfect balance for your specific video. You'll be surprised at how small you can get your files while keeping them looking incredible.
For a deeper dive into shrinking file sizes, check out this comprehensive guide on how to compress video. Whether you’re getting marketing assets ready, like we talk about in our guide on how to create an explainer video, or just trying to share a clip with a friend, these principles will help you get sharp, pro-level results every single time.
Speaking the Language of Video Compression

To really get a handle on video compression, you first need to speak its language. The settings in tools like HandBrake might look complicated, but they’re built on just a few core ideas that are surprisingly simple once you get the hang of them.
Knowing these terms is your ticket to moving beyond generic presets. It's how you start making smart choices that keep your video looking sharp while cutting down its file size.
Containers vs. Codecs: The Box and the Language
Every single video file you've ever used is made of two parts: a container and a codec. It's a critical difference that trips a lot of people up.
Think of the container as the box the video ships in. This is the file extension you see, like .MP4, .MOV, or .AVI. The container's job is to hold all the different pieces together—the video stream, the audio, any subtitles—but it doesn't actually compress the data inside.
The codec (which is short for coder-decoder) is the language used to write down the video and audio information inside that box. This is where the real magic of compression happens. The most common codecs you'll run into are H.264 (AVC) and its newer, more efficient cousin, H.265 (HEVC).
Picking the right codec makes a massive difference. For instance, H.265 is about 50% more efficient than H.264. That means it can deliver the same visual quality at roughly half the file size. When you're trying to shrink a video without making it look terrible, choosing a modern codec is the most powerful move you can make. A solid grasp of different video file types and formats is pretty essential here.
Comparing Modern Video Codecs
To put this in perspective, let's look at how the most common codecs stack up against each other. Each one was designed with a specific purpose in mind, from universal playback to maximum efficiency for 4K streaming.
| Codec | Efficiency (vs H.264) | Best For | Compatibility |
|---|---|---|---|
| H.264 (AVC) | Baseline (1x) | Universal web video, older devices | Excellent (Plays everywhere) |
| H.265 (HEVC) | ~50% more efficient | 4K/UHD streaming, modern cameras | Good (Most new devices) |
| AV1 | ~30% more efficient than HEVC | High-quality streaming (YouTube, Netflix) | Growing (Modern browsers/devices) |
| VP9 | ~Similar to HEVC | Google/Android ecosystem, YouTube | Very Good (Most modern browsers) |
Choosing between these often comes down to a trade-off between file size and how many people can easily play your video. While AV1 is the future, H.264 is still the king of compatibility.
Bitrate: Your Video's Data Budget
If the codec is the language, then bitrate is how much detail you're allowed to use when describing each second of video. It's measured in megabits per second (Mbps), and you can think of it as your video's data budget.
A higher bitrate means more data per second, which leads to better quality and a much larger file. A lower bitrate saves space but can introduce ugly artifacts if you push it too far.
There are two main ways to set your bitrate:
- Constant Bitrate (CBR): This is the "dumb" approach. It assigns the exact same amount of data to every second of the video, regardless of what's happening on screen. A quiet, static scene gets the same data budget as a fast-paced action sequence. It’s predictable but incredibly inefficient.
- Variable Bitrate (VBR): This is the smart way to do it. VBR is clever enough to give more data to complex scenes with lots of motion and less data to simple, static shots. This flexibility is key to maintaining high quality where it counts while optimizing the overall file size.
For just about every situation you'll encounter, VBR is the way to go. It does a much better job of balancing quality and file size, giving you a far better-looking video for the same amount of data.
Resolution and Frame Rate: The Foundation
You probably already know about resolution and frame rate, but how they interact with bitrate is what really matters for compression.
Resolution is just the number of pixels that make up each frame (like 1920x1080 for 1080p, or 3840x2160 for 4K). Naturally, a higher resolution needs a higher bitrate to stay looking crisp. This is why a 4K video with a low, starved bitrate can often look much worse than a 1080p video with a healthy data budget.
Frame rate (measured in frames per second, or fps) is how many individual images flash on the screen each second. Most video is shot at 24 or 30 fps, while things like sports or video games often use 60 fps for smoother motion. More frames demand more data, so a 60 fps video needs a higher bitrate than a 30 fps video to look equally sharp. This balance is a key part of the process, something we touch on in our comprehensive guide to video editing.
These concepts have been around for a while. Back in 1996, the MPEG-2 standard was a game-changer. It made digital TV and DVDs possible by squeezing video data from hundreds of Mbps down to a workable 2-15 Mbps. Today's codecs are light-years ahead, but the fundamental principle of balancing these key elements is exactly the same.
Your Practical Toolkit for High-Quality Compression
Alright, let's move from theory to practice. This is where you really learn the ropes of compressing a video without turning it into a pixelated mess. It’s time to get your hands dirty with the software that pros and enthusiasts alike rely on to shrink video files while keeping them looking sharp. We’ll dig into a few industry workhorses that give you the perfect mix of control and ease of use.
We're going to skip the generic, one-size-fits-all presets. Instead, we'll walk through real-world situations, like taking a massive 4K GoPro clip and slimming it down for an Instagram Reel, or prepping a client’s wedding video for fast, beautiful playback on their website. The goal here is to make you comfortable enough to open these tools and know exactly which dials to turn.
Mastering HandBrake for Smart Compression
HandBrake is a free, open-source transcoder that's been a crowd favorite for years, and for good reason. It gives you an incredible amount of control over your compression settings, letting you fine-tune just about every aspect of the final video. While the interface might look a bit intimidating at first, you only need to master a couple of key settings to get fantastic results.
The most important setting in HandBrake isn't bitrate; it's the Constant Rate Factor (CRF).
CRF is a quality-based encoding setting. Instead of telling the encoder to hit a specific data target per second (like a traditional bitrate), you tell it what level of quality you want to maintain. The software then intelligently assigns more data to complex, high-motion scenes and less to simple, static ones. This is the secret sauce for efficient, high-quality compression.
A lower CRF number means higher quality and a bigger file. A higher number means lower quality and a smaller file. It’s a simple trade-off.
- For high-quality master files you plan to archive, a CRF of 18-20 is a great place to start.
- For web streaming on platforms like YouTube or social media, a CRF between 20-23 typically hits the sweet spot between quality and size.
- Pushing past 24 will usually introduce noticeable compression artifacts.
This flow chart visualizes the core decisions you'll be making as you prep a video for the web.
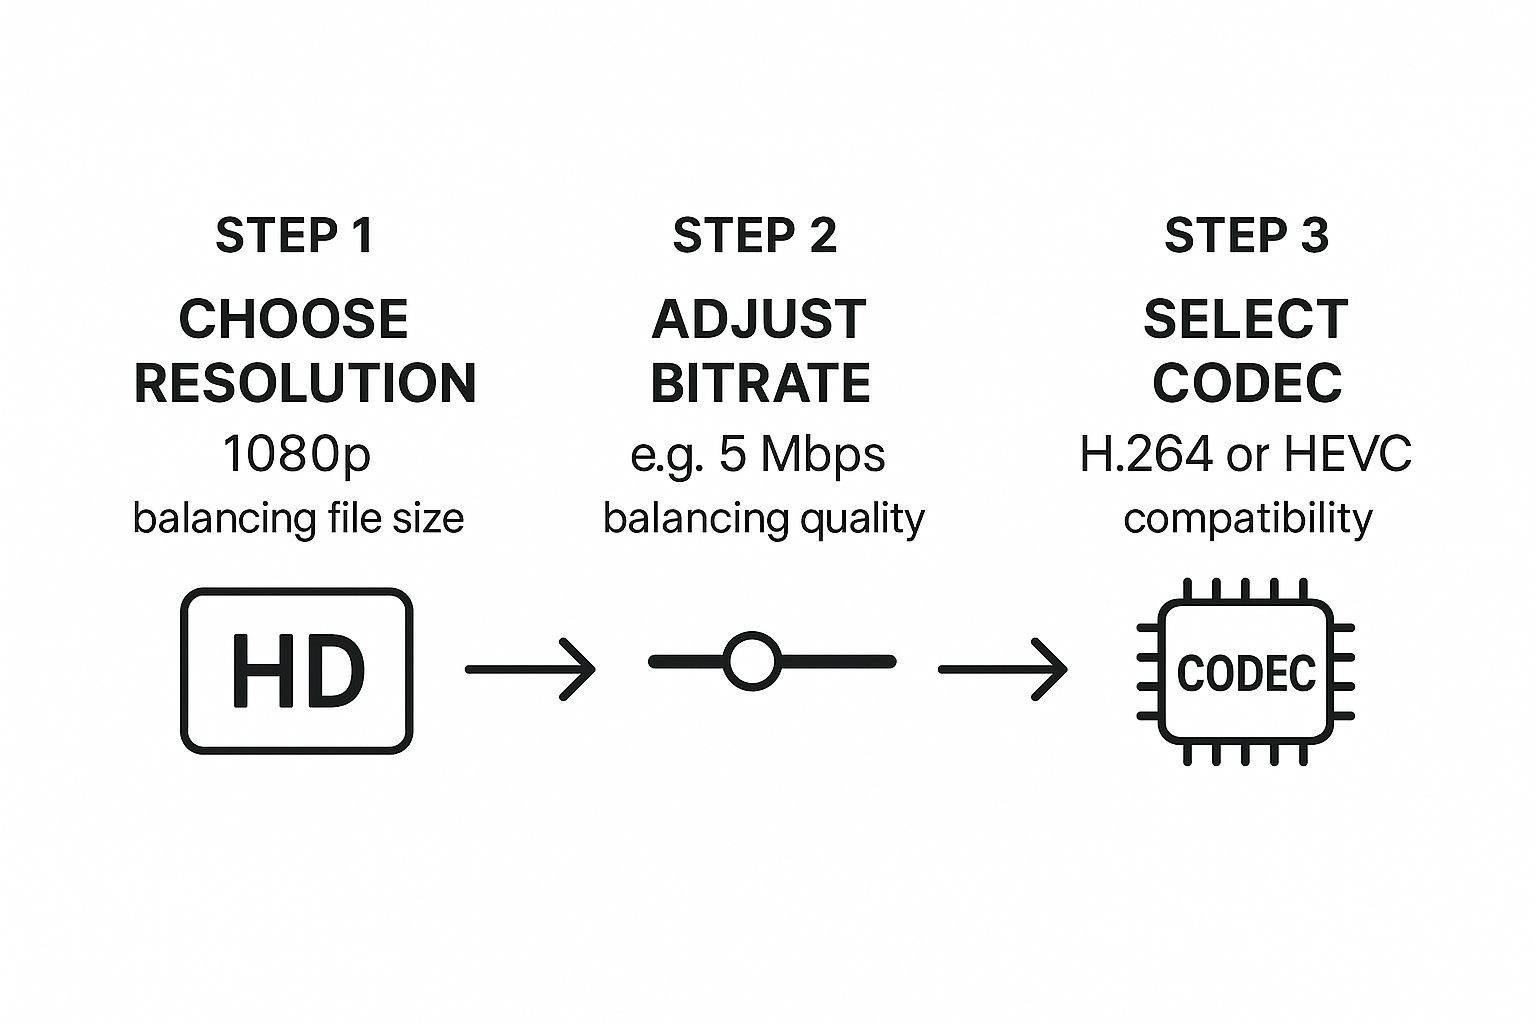
The key takeaway is that resolution, bitrate (or your quality setting), and the codec all have to work together. It’s a balancing act to get that perfect mix of a small file size and crisp visual fidelity.
Adobe Media Encoder for Professional Workflows
If you’re already in the Adobe Creative Cloud ecosystem, using tools like Premiere Pro or After Effects, then Adobe Media Encoder is your natural next step. It's built from the ground up for professional workflows, letting you queue up and batch-process tons of videos into a huge variety of formats. It's the daily workhorse for countless video editors and content creators. Of course, great compression starts with great source material. To capture crisp footage right from the start, check out the best screen recorder with facecam options.
This interface highlights the key areas: you select your format (H.264 is the go-to), pick a starting preset, and then dive into the detailed bitrate settings to take control.
While Media Encoder supports quality-based encoding, it's more commonly used for VBR (Variable Bitrate) 2-Pass encoding. This is another incredibly powerful technique:
- First Pass: The software does a full analysis of your video, identifying which scenes are complex and which are simple. It’s basically creating a data map of your entire timeline.
- Second Pass: Using the map from the first pass, it applies the compression, intelligently spending your target bitrate where it's needed most to deliver the best possible quality for that specific file size.
This two-pass method takes a bit longer, but it almost always produces better results than a single-pass VBR encode, especially on videos that have a lot of visual variety. For a deeper dive into editing tools that can prep your files perfectly, take a look at our guide on the https://www.moonb.io/blog/best-video-editing-software.
Shutter Encoder: A Versatile Alternative
Shutter Encoder is another fantastic free tool that's been gaining a lot of traction because of its sheer versatility. It supports a massive range of codecs and functions, going way beyond simple compression. Think of it as a Swiss Army knife for video work. It's perfect for when you need to convert a video to a niche professional format or just want a powerful, reliable transcoder that costs nothing.
When it comes to high-quality compression, its settings will feel familiar if you've used HandBrake. You can easily pick a modern codec like H.265 (HEVC) for maximum efficiency and then use a quality-based slider (which functions just like CRF) to dial in your desired output.
A Real-World Scenario: Compressing a GoPro Clip
Let's put this into action. Say you have a 1-minute 4K clip (at 60fps) from a GoPro. The original file is a chunky 750 MB—way too big to just fire off to social media.
Your goal: Get it ready for Instagram, which is happiest with 1080p video.
Here’s a simple workflow using HandBrake:
- Open the Clip: Drag your 750 MB file right into HandBrake.
- Choose a Preset: Start with the "Fast 1080p30" preset. It's a solid baseline.
- Adjust the Codec: Head to the "Video" tab and switch the encoder to H.265 (x265). It's more efficient.
- Set the Quality: Slide the CRF value to 22. This is a great sweet spot for web quality.
- Change the Frame Rate: Instagram doesn't need 60fps, so switch the frame rate down to "30."
- Start Encoding: Hit the big green "Start Encode" button and let it do its thing.
The result? Your new file is a crisp 1080p video, perfectly smooth at 30fps, and the file size has plummeted to around 40 MB. That's a reduction of over 94% with practically zero noticeable quality loss when you're watching it on a phone. This is the power you have when you use the right tools and the right settings.
Go Pro: Advanced Techniques for Maximum Quality Retention
Once you’ve got the basics down, it’s time to look under the hood. The real magic in video compression happens when you move past the default presets and start manually tweaking the settings. This is how pros and perfectionists squeeze every last drop of quality out of a compressed file.
Think of it like the difference between a quick car wash and a professional detail. Both get the job done, but one delivers a noticeably superior finish. The following methods will help you get that pro-level polish on your videos.
Let Your Encoder Do a "Dry Run" With Two-Pass Encoding
One of the most effective tools in your compression arsenal is Two-Pass Encoding. It definitely takes longer to process, but the quality jump you get for a given file size is almost always worth the extra time. It’s simply a smarter, more calculated way to compress.
Here’s the breakdown of how it works:
- The First Pass: The encoder scans your entire video from beginning to end without actually compressing anything. Instead, it’s creating a detailed map, taking notes on which scenes are simple and static (like a talking head) versus which are packed with complex motion (like an action sequence).
- The Second Pass: Now, armed with that analytical map, the encoder goes back and does the actual compression. It intelligently allocates your data budget—the bitrate—spending more bits on the complex scenes that need it and saving data on the simpler ones.
This approach is far more efficient than a standard one-pass encode, which is forced to make compression decisions on the fly without knowing what’s coming next. The result is a sharper, cleaner video at the exact same file size.
Why You Should Choose Slower Encoder Speed Presets
You've probably seen that dropdown menu in your encoding software with options like "Ultrafast," "Medium," and "Slow." It’s tempting to pick a faster option to get the job done quickly, but this setting has a direct and significant impact on your final quality.
These presets don't change the visuals directly; they change how much effort the encoder puts into finding the most efficient way to compress each frame.
A slower preset gives the encoder more time to analyze the video and make smarter decisions. This results in better compression efficiency, meaning you can achieve the same visual quality at a lower bitrate, which ultimately leads to a smaller file.
For instance, encoding a project on the "Slow" preset might take twice as long as "Medium," but it could produce a file that’s 10-15% smaller with identical perceived quality. When you’re dealing with hours of footage, those savings add up fast. This level of detail is crucial when crafting polished content, as you can see in these great explainer video examples that benefit from such a careful approach.
Don’t Sleep on Audio Compression
While video data eats up the vast majority of a file, audio is the unsung hero of file size reduction. So many people just leave audio settings on default, but a few quick tweaks here can trim your file size without anyone ever noticing the difference in sound quality.
Modern codecs like H.264 and HEVC (H.265) can achieve up to 50% more compression than older standards, but don't let the audio be an afterthought.
Here are the key audio settings to dial in:
- Audio Codec: For pretty much any video destined for the web, AAC (Advanced Audio Coding) is the industry standard. It gives you excellent quality at low bitrates and is universally compatible.
- Bitrate: You almost never need an uncompressed audio stream for a web video. A stereo bitrate of 128 kbps or 160 kbps is usually indistinguishable from the original for most people listening on standard speakers or headphones. If your video is just dialogue, you might even get away with 96 kbps.
- Channels: Is your audio just a single person speaking? Don't export it in stereo. Switching to a mono track can literally cut your audio data in half with zero loss in quality.
By fine-tuning these advanced video and audio settings, you gain complete control over that delicate balance between file size and visual fidelity. It’s this meticulous approach that separates good results from truly professional ones.
Common Compression Mistakes and How to Avoid Them

Even with the best software, it’s surprisingly easy to make a few wrong moves that can absolutely destroy your video’s quality. Knowing how to compress a video without turning it into a pixelated mess is as much about dodging common pitfalls as it is about picking the right settings. Let's walk through the mistakes I see all the time and how you can sidestep them.
The single most critical error is re-compressing an already compressed file. Every single time you run a video through a lossy encoder, it throws out a little more data. Do this a few times, and you get a snowball effect known as generational loss, where each new version is noticeably worse than the one before it.
Think of it like making a photocopy of a photocopy. The first one looks fine, but by the fifth or sixth copy, the image is a blurry, distorted mess. The rule is simple: always work from your original, high-quality master file whenever you need to create a new compressed version.
The Problem With One-Size-Fits-All Exports
Another common trap is using one export preset for every single platform. What looks perfect on YouTube won't be optimal for an Instagram Reel or a LinkedIn ad. It just won't. Each platform has its own very specific requirements for resolution, bitrate, and even the codecs it prefers.
A generic approach almost always leads to one of two bad outcomes: either the file is way bigger than it needs to be, or the platform will re-compress your video aggressively to fit its own standards, often resulting in terrible quality.
To avoid this, take the time to create custom export presets for your most-used destinations. Here’s a quick cheat sheet based on my own experience:
- YouTube: This platform loves high bitrates. Don't be shy about uploading a larger file; its encoder is surprisingly good at optimizing it without sacrificing quality.
- Instagram Reels: Needs vertical video (9:16 aspect ratio) and is all about mobile viewing. Super high bitrates are complete overkill here.
- Website Banners: File size is everything. The top priority is fast page loads, so you’ll want to compress these much more aggressively.
Having a solid plan for your content saves so many headaches down the line. If you're mapping out your distribution, our complete video marketing checklist is a great resource to make sure all your bases are covered.
Over-Compression and Ugly Artifacts
In the quest for the smallest possible file, it's really easy to push it too far. Over-compressing means setting the bitrate too low for the content of the video, which introduces distracting visual flaws called artifacts. This is the fastest way to make your expensive footage look cheap and unprofessional.
Key Takeaway: Your goal is not the smallest file possible, but the smallest file that still looks great. Pushing the bitrate too low creates ugly artifacts that permanently degrade your video's professional look.
Keep an eye out for these common artifacts:
- Blockiness (Macroblocking): You’ll see noticeable squares pop up in areas with a lot of motion or in subtle gradients, like a clear blue sky.
- Color Banding: Smooth color transitions, like a sunset, get replaced with distinct, ugly bands of color.
If you spot these issues, your bitrate is too low. Just bump it up slightly (or lower your CRF value if you're using that method) and export it again.
Forgetting About the Audio
Finally, don't sleep on the audio track. While the video data makes up most of the file, audio still adds to the total size. Leaving your audio settings on "Auto" or, worse, using an uncompressed format is a huge missed opportunity for easy file size savings.
For pretty much any video destined for the web, using the AAC codec at a bitrate between 128-160 kbps delivers fantastic quality that's indistinguishable from the original for most listeners. This one simple tweak can shave valuable megabytes off your final export, and nobody will ever hear the difference.
Got Questions About Video Compression? We've Got Answers
Even when you have the best tools at your fingertips, a few questions always seem to pop up during the compression process. Getting straightforward answers is the key to polishing your workflow and tackling any weird issues that come up. Let's dive into some of the most common questions we hear from creators and marketers.
What Is the Difference Between Lossless and Lossy Compression?
Think of lossless compression like a ZIP file for your video—it shrinks the file down but keeps every single bit of the original data perfectly intact. This is fantastic for archiving your master files, but the videos are still gigantic and totally impractical for streaming or sharing online.
Lossy compression, on the other hand, is much smarter about it. Codecs like H.265 are designed to intelligently toss out visual and audio information that the human eye or ear is unlikely to notice anyway. The goal here is to get a perceptually lossless result: a video that’s technically been compressed with a lossy method but looks identical to the original.
Should I Lower Resolution or Bitrate to Reduce File Size?
Nine times out of ten, you should start by optimizing the bitrate first. A 1080p video with a healthy, well-managed bitrate will look miles better than a 4K video that's been starved of data. When you choke a high-resolution video's bitrate, you get that blocky, artifact-riddled mess nobody wants to see.
Pro Tip: Try using a quality-based setting like Constant Rate Factor (CRF). It’s a fantastic way to let the encoder find the perfect bitrate sweet spot for your specific footage. Only think about dropping the resolution—say, from 4K down to 1080p—if you need a massive reduction in file size or know for a fact the viewing platform doesn't support the higher resolution.
What Is the Best Format for Compressing Video?
For the ultimate trifecta of quality, efficiency, and compatibility, you can't go wrong with the H.265 (HEVC) codec packaged inside an MP4 container.
The MP4 container is your ticket to making sure the video plays on virtually any device or platform out there. At the same time, the H.265 codec delivers around 50% better compression efficiency than its older cousin, H.264. This means you can achieve the exact same visual quality at roughly half the file size.
Of course, if you need to support much older devices that might not handle H.265, falling back to H.264 is still a very reliable and safe bet.
Why Does My Compressed Video Look Blocky or Blurry?
That blockiness you're seeing—technically called macroblocking—is the classic sign of over-compression. It happens when the bitrate is just too low for the complexity of the video. Think fast-paced action, scenes with tons of detailed textures, or subtle gradients like a clear blue sky.
The fix is simple: you just need to give the video stream more data to work with. There are a couple of ways to do this:
- If you're setting a target bitrate: Just bump up the number (e.g., from 5 Mbps to 8 Mbps).
- If you're using CRF: Choose a lower CRF number (e.g., move from 23 down to 20). This tells the encoder to prioritize higher quality and hold on to more detail.
Ready to create stunning, high-quality videos without the hassle? With Moonb, you get an entire on-demand creative team—from animators to scriptwriters—for a single flat monthly fee. Stop worrying about hiring and start creating. See how Moonb can transform your video content today.
Frequently asked questions
If you can describe the audience, the action you want, and the channel in three short sentences without using marketing jargon, the brief is ready to move into production.
Scope creep introduced mid-process. The cure is locking the brief before kickoff and treating new asks as a separate, follow-up project rather than additions to the current one.
Distribution. Teams design the asset before deciding where it will live, then awkwardly retrofit format and length to the channel. For creative production, decide the channel first, then design backward.

